
How to Read Your Human Design Chart
To read your Human Design chart, go in order: your Type, Strategy and Authority first, then your Centers, Profile, Definition, Gates and Channels, and your Incarnation Cross.
Think of your chart like a new city: learn the main roads first (how your energy works and how you decide), and the side streets start to make sense on their own.
On this page: the eight steps in order, what you are looking at on your BodyGraph, what the colors and numbers mean, and how to practice on your own chart.
Read it with your chart open. Don't have it yet? Get your free chart in about a minute, then follow along step by step.
How to read your Human Design chart in the right order
Read your chart in eight steps. The first three change your day the fastest; the other five add detail once they click.
- 1TypeHow your energy works. One of five, named in your chart details.
- 2StrategyHow to meet life with less resistance. It comes with your Type.
- 3AuthorityHow you are built to make decisions. Named in your chart details.
- 4CentersWhere you are consistent and where you are open: the nine shapes, colored or white.
- 5ProfileThe role you play, two numbers like 5/1, from the lines of your two Suns.
- 6DefinitionHow your colored Centers connect: as one group, or split into several.
- 7Gates and ChannelsYour specific themes: 64 Gates (the numbers) and 36 Channels (the lines).
- 8Incarnation CrossYour life theme, from the four Gates of your Sun and Earth.
Prefer to have it read for you? A Human Design reading writes out every step for your exact chart.
What is a Human Design chart?
A Human Design chart, also called a BodyGraph, is a visual map of how your energy naturally works. It is calculated using your birth date, exact birth time, and birth location, and it shows how you are designed to move through life, make decisions, use your energy, and interact with the world around you.
At first it can look like a lot: shapes, lines, numbers, colors and two side columns. It gets easy when you stop trying to decode it all at once and learn what each layer shows, in order. Your chart is not there to box you in. It shows where you are consistent, where you are open, and how to make choices that feel natural instead of forced.
If you want the broader meaning first, read Human Design Chart Meaning. If you want help decoding the visual layout, visit Human Design Chart Symbols.
What you're seeing when you look at your BodyGraph
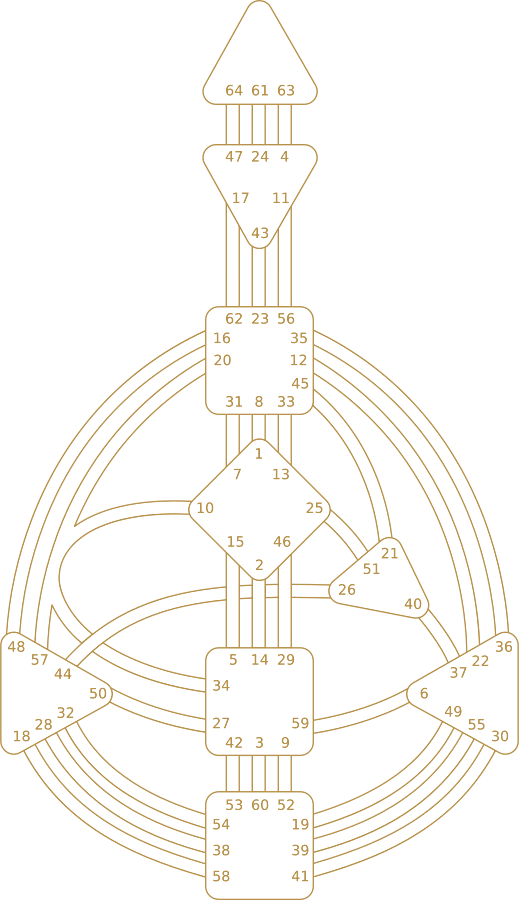
Your BodyGraph has four parts to learn: the Centers (the shapes), the Channels (the lines between them), the Gates (the numbers) and the two columns of planets beside the body. Learn these and every step below has something on your chart to point at.
Don't have your chart yet? Generate your free chart, then come back and read it step by step.
Centers
The 9 shapes: Head, Ajna, Throat, G, Heart, Solar Plexus, Sacral, Spleen and Root. Each one carries a different kind of energy, and each is either colored in or white on your chart.
Learn more: Human Design Centers
Channels
The lines that join two Centers. There are 36. A Channel is defined when both of its Gates are active in your chart, and it points to a stable, repeatable theme in your life.
Learn more: Gates & Channels
Gates
The 64 numbers on the Centers. A Gate is active when one of your planets sits in it, and each one adds a specific theme to your design.
Learn more: Explore Gates
Design and Personality columns
Two columns of planets. Personality, in black, is calculated for the moment you were born: the side you know. Design, in red, is calculated for when the Sun was 88 degrees earlier, about 88 days before your birth: the side that runs below awareness. A number like 41.3 is a Gate (41) and its line (3).
Need the visual breakdown? See Human Design Chart Symbols.
Colors key: what colored versus white means
One of the fastest ways to understand your chart is to learn what the colors are showing you: consistency versus openness.
Colored parts of the chart usually point to stable energy. White parts usually point to openness, amplification, learning, and conditioning. Neither is better. They simply work differently.
Colored Centers (defined)
A colored Center usually means that area of energy is consistent for you. It is where you tend to be steady, reliable, and self-generated.
White Centers (undefined)
A white Center usually means you are open there. You can amplify others, absorb the environment, and develop wisdom there, but it can also be where conditioning happens.
Colored Channels
A colored Channel means both of its Gates are active, which defines the two Centers it joins. It is a theme you live all the time. Red comes from your Design side, black from your Personality side, and a striped Channel from both.
White Channels
A white Channel is not consistent all the time. You may experience it through other people, environments, or timing, but it is not your default baseline.
Want a deeper breakdown? Read Defined vs Undefined Centers in Human Design.
Step 1: Find your Type
Your Type is your starting point. It explains how your aura works and how your energy is designed to interact with life.
Type helps you understand the way your energy is meant to move. It gives immediate clarity around why some ways of living feel natural and energizing while others leave you drained, resistant, or out of sync.
- Generator, about 35% of people: sustainable life force when responding to what is correct
- Manifesting Generator, about 35%: fast, multi-passionate energy that responds, then informs before acting
- Projector, about 21%: here to guide others, where recognition and the invitation matter
- Manifestor, about 9%: here to initiate, where informing others removes resistance
- Reflector, about 1%: no defined Centers, a mirror of the people and places around them
Quick tip: if you only learn one thing first, learn your Type. It is the doorway to everything else.
Step 2: Learn your Strategy
Your Strategy is how life works best for you. It shows the correct way for opportunities, people, and timing to meet you with less resistance.
Strategy helps you stop forcing life from the mind. It shows whether you are here to respond, wait for the invitation, inform, or give yourself time. This is often where the chart starts to feel practical because it changes how you move through real decisions and real timing.
Your Strategy comes with your Type:
- Generator: to respond
- Manifesting Generator: to respond, then inform before acting
- Projector: wait for the invitation
- Manifestor: inform before you act
- Reflector: wait a lunar cycle
How you know it is working: living your Strategy brings your signature (Satisfaction for Generators and Manifesting Generators, Success for Projectors, Peace for Manifestors, Surprise for Reflectors). Ignoring it brings the not-self theme instead: Frustration, Bitterness, Anger or Disappointment.
Step 4: Understand your Centers
Centers show where your energy is consistent and where you are more open or sensitive.
Centers help explain why certain patterns repeat in your life. They show where you may feel pressure that is not yours, where you over-identify with other people's energy, and where your own energy is naturally reliable.
Centers answer questions like:
- Where do I feel pressure that is not mine?
- Where do I overthink or seek approval?
- Where am I steady and reliable?
For many people this is where things click, because it explains conditioning patterns and emotional or mental loops.
Step 5: Learn your Profile
Your Profile is your life theme and the role you naturally play as you move through experience.
Your Profile is shown as two numbers, like 5/1, 2/4, or 6/2. The first is the line of your Personality Sun, the side you know; the second is the line of your Design Sun, the side others often meet first. There are six lines: 1 Investigator, 2 Hermit, 3 Martyr, 4 Opportunist, 5 Heretic and 6 Role Model, and they pair into 12 Profiles.
This part of your chart often helps you understand why you relate to work, relationships, learning, and visibility the way you do.
Step 6: Check your Definition
Your Definition describes how your energy is connected internally. It can affect how you process, integrate, and feel complete within yourself.
Your chart names it: Single Definition (all your colored Centers connect as one group), Split Definition (two groups), Triple Split (three) or Quadruple Split (four). A Reflector has no Definition, because no Centers are defined.
This is a deeper layer, and it becomes more useful once your Type, Strategy, and Authority are solid.
Why Definition matters
It can explain why you feel more self-contained, why you seek connection, or why certain relationships feel stabilizing.
Beginner approach
Note it, but do not obsess over it early. Your decision-making process will do more for you day to day.
Step 7: Explore your Gates & Channels
Gates and Channels add detail. They describe specific themes and consistent traits in your design, but they are not where you should start.
There are 64 Gates and 36 Channels. A Channel is defined when both of its Gates are active, and it colors in the two Centers at its ends. A Gate that is active without its partner is a hanging Gate: a theme you carry on its own, often felt most around people who have the other half. These layers mean much more once your foundation is clear, because then you can place the details inside a chart you already understand.
If you want to explore them, use Human Design Gates & Channels as your main hub.
Step 8: Find your Incarnation Cross
Your Incarnation Cross is a broader life-theme layer in Human Design. It is built from four Gates: your Personality Sun and Earth and your Design Sun and Earth, the same two Suns your Profile comes from. It tends to become clearer as you live your design over time.
This is not the place to begin, but it can become powerful later. Once you understand how your energy works and how you make decisions, your Incarnation Cross starts to feel less like a label and more like a living theme running through your life.
Beginner tip: treat the Incarnation Cross like a lens, not a label. Strategy and Authority still come first.
Read it on your own chart
You have the eight steps. Now open your own chart and walk through them in order, starting with what your chart details name for you.
Steps 1 to 3
Find your Type, Strategy and Authority in your chart details. They are the three to live by first.
Steps 4 to 6
See which Centers are colored and which are white, then read your Profile numbers and your Definition.
Steps 7 and 8
Follow your colored Channels to the Gates they connect, then find the four Gates of your Incarnation Cross.
Don't have your chart open? Get your free chart and follow the eight steps on it, in order.
Real life examples: out of alignment versus in alignment with your design
Knowing your chart can change how you use your energy, how you make decisions, and how much pressure you stop putting on yourself to be like everyone else. What you called inconsistency, overthinking or burnout was often a sign you were living against your design. The chart becomes most useful when you can feel the difference between living against it and living with it.
Energy
Out of alignment: You keep pushing, overcommitting, and wondering why everything feels heavy.
In alignment: Your energy feels cleaner, more sustainable, and more naturally directed toward what is correct.
Decision-making
Out of alignment: You overthink, second-guess yourself, and look outside yourself for certainty.
In alignment: You begin trusting your Authority and feel more settled in the choices you make.
Emotions
Out of alignment: You feel reactive, pressured, bitter, frustrated, angry, or disconnected without understanding why.
In alignment: You feel more clear, more honest, and more at ease because your life fits your design better.
Relationships
Out of alignment: You try to be who others need, then end up drained, unseen, or resentful.
In alignment: You relate from a truer place and stop building connection through self-abandonment.
Work
Out of alignment: Work feels like constant resistance, wrong timing, or misused energy.
In alignment: You begin choosing work, opportunities, and timing that fit your natural design better.
Inner experience
Out of alignment: Life feels noisy, forced, and hard to trust.
In alignment: Life may not be perfect, but it feels more honest, more grounded, and more like your own.
Common mistakes when reading your chart
- Starting too deep: jumping into Gates and Channels before Type, Strategy, and Authority click
- Trying to understand everything from the mind: your chart is meant to be lived, not just memorized
- Using generic advice: your chart is personal, so your patterns will not match someone else's exactly
- Over-focusing on labels: clarity comes from application, not collecting terms
Best next step: practice your Strategy and Authority for 7 to 14 days and watch what changes. Then come back and go deeper.
When you want it taught to you: the Masterclass
The Masterclass takes you the whole way: 24 lessons in four stages, from your first look at a chart to reading one cold. Every lesson is taught from your own chart inside your private dashboard, with an In Your Chart callout that points at your actual design and a short quiz before you move on. Your progress saves as you go.


The Masterclass is included with the $99 Complete Reading, nothing extra to buy. See everything inside the Complete Reading.
FAQ: Human Design Chart Reading
How do you read a Human Design chart?
You read a Human Design chart by starting with your Type, Strategy, and Authority. These three elements explain how your energy works and how you are designed to make decisions. From there, you can explore your Centers, Profile, Definition, Gates and Channels, and Incarnation Cross to understand deeper patterns in your design.
What is the difference between reading a chart and getting a full reading?
Reading your chart yourself gives you the structure: your Type, Strategy, Authority, and where your energy is defined or open. That is what this guide teaches, and it is free. A full personalized Human Design reading is different. It is 60+ sections written from your exact birth data, covering every Center, Channel, and Gate in your chart individually, plus your Incarnation Cross, your planetary influences, relationships, career, and life phases. It comes with a Masterclass that teaches you to read charts yourself, your Self-Discovery Notebook, two personal MP3s, Jessica, an AI guide who already knows your chart, and a private dashboard with growing workbook and meditation libraries and a members Community (coming soon). It is $99 once and yours forever. Most people start with the free chart, then get the reading when they want the depth.
What does a Human Design chart mean?
A Human Design chart represents your energetic map. It shows how you are designed to use your energy, interact with the world, and make aligned decisions based on your natural design.
What is a Human Design chart explained simply?
A Human Design chart is a visual map of how your energy works. It helps you understand your Type, Strategy, Authority, and the deeper patterns shaping how you move through life.
How can I understand my Human Design chart?
The best way to understand your Human Design chart is to begin with your Type, Strategy, and Authority. Once those are clear, the deeper parts of the chart start making much more sense.
What do the numbers mean in a Human Design chart?
The numbers on the Centers are the 64 Gates, and a Gate is colored in when one of your planets activates it. In the two side columns, each planet shows a number like 41.3: the Gate (41) and its line (3). Red numbers are your Design side and black numbers your Personality side.
Why is my Human Design chart different from someone else's?
Every Human Design chart is unique because it is based on your exact birth date, time, and location. Even small differences in birth time can shift parts of the chart, which is why your design is specific to you.
What should I learn first from my chart?
Start with your Type, then Strategy, then Authority. These three elements create the strongest practical foundation. Everything else in the chart becomes easier to understand once those are clear.
Is there a course that teaches me to read my own chart?
Yes. The Masterclass is 24 lessons in four stages, taught from your own chart inside your private dashboard, with a short quiz in every lesson and your progress saved. It comes with the $99 Complete Reading. This guide and your free chart are free and cover the eight steps in order.
Can I interpret my Human Design chart for free?
Yes. Get your free chart, then follow the eight steps on this page in order: Type, Strategy, Authority, Centers, Profile, Definition, Gates and Channels, and Incarnation Cross. When you want every part of it written out for you, the Complete Reading is 60+ sections for $99.